Using Azure Functions to Create a Changeset Bot
Jan 16th, 2023
•
views
🌟This is a long article. For those who'd prefer to look at code, rather than read a longer article you can browse the code here.
In my time at Hugo Health, when I am not working on data operations and scaling, I have been helping to facilitate a major refactor of our systems. A huge part of this is the way that we manage our packages.
Admittedly, the way we used to do things was a bit of a mess. Most everyone there would probably agree with that sentiment. So, we decided to change things up. We had a few things we wanted to accomplish with these changes.
- We wanted human readable descriptions of the changes made to each project, but we didn't want too add to much extra effort into commiting these changes.
- We wanted to add Semantic Versioning. Semantic Versioning allows you to know at a glance what sort of changes the update contains.
- Patch - Backwards compatible bug fix
- Minor - Backwards compatible functionality
- Major - Incompatible changes
We decided that the best way to go about doing this would be to use @changesets/cli to automatically version and generate a changelog for each of our packages.
We had one issue with moving forward with this route -- there was no readily available integrations with Azure DevOps.
Why Changesets?
After messing around with the cli, it seemed as if this was a great, relatively easy way of having our devs declare their changes prior to publishing the package. Why? It's pretty simple to use.
After making your changes, run the command yarn changeset, and enter what kind of changes you are making.
🦋  What kind of change is this for codegarden? (current version is 0.1.0) …
❯ patch
  minor
  major
Generally, I like to run this command for every "feature" included in the PR (though, we generally don't include more than one feature per pull request as a general practice).
When you're completely done with your changes, just before opening the pull request, run yarn changeset version.
This command will automatically update the version of the package, and generate the corresponding changelog. It will bump the package to the minimum version required within all included changeset files.
Finally, using the command yarn changeset publish will publish the changes to the registry.
Planning our Bot
When doing research on how to create this bot, I came across an open issue in the @changesets/changesets repository from March 11, 2020 with activity as recent as 4 days ago (January 12, 2023 at the time of writing this).
It seemed as if there was a geniune interest in accomplishing this, especially because it was already possible using Github Actions.
Pull Request Flow
We got to thinking that this would be a pretty good use case for Azure Functions. Functions is a serverless solution, similar to Vercel Serverless Functions and AWS Lambda. These three services can accomplish roughly the same thing, but we went with Azure since we were already in their ecosystem. There was already existing functionality using Azure Pipelines to post to an external service on Pull Request Creation or Update.
To brainstorm, we decided to map out the ideal steps to our pipeline.
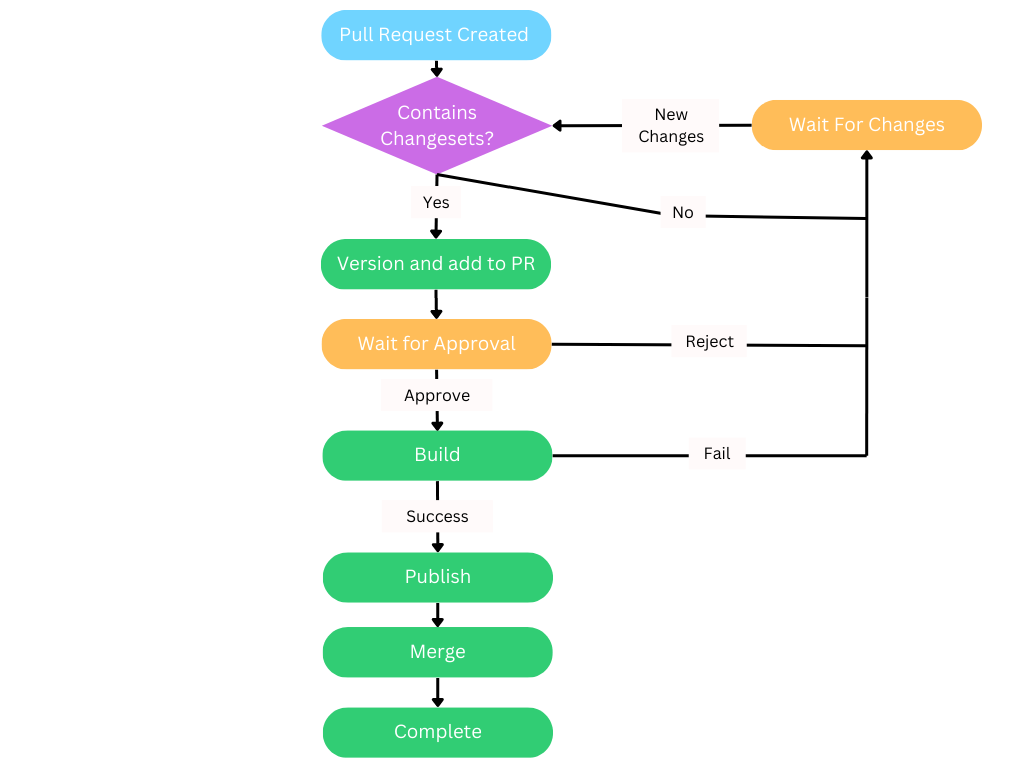
Our bot will be responsible for executing the "Contains Changeset" and "Version and add to PR" steps of this flowchart.
We have existing pull request checks that require that all comments be resolved prior to being able to merge. So the easiest way, by default, to implement this functionality would be to have our bot create a comment that blocks the merge and updates the comment when it finds the missing changeset.
Changeset also allows an empty changeset for changes that aren't meant to be "released". For example commits containing developer tooling, changes to a tsconfig, etc.
Bot Steps
To accomplish the above, we need our bot to check for two things.
- Does the pull request contain any changesets? If it does, leave a closed comment on the PR confirming that it does, then move on to the next step.
- If the changeset requires a version bump (i.e. the changeset is not empty), run
changeset version, and push those changes to the PR.
We can use the azure-devops-node-api, and a combinations of the packages from the @changesets/changeset monorepo to accomplish both of these tasks.
Building the Function
For those unfamiliar with Azure Functions, getting it up and running on your machine is fairly simple, especially if you use Visual Studio Code.
I'll run over the instructions for getting started. I am using MacOS, but the only step this effects is using the homebrew package manager to install Azure Functions Core Tools. For other operating systems, check out Azure's documentation.
Setup
On MacOS, the only prerequisites here are having Homebrew and Visual Studio Code installed on your machine.
1. Install Azure Functions Core Tools
Using homebrew, we will start by installing the core tools.
brew tap azure/functions && brew install azure-functions-core-tools@42. Install the Azure Functions VSCode Extension
Use the install button here to install the extension, or type "Azure Functions" into the extension search bar in visual studio code and install from there.
3. Create a New Project Directory
Create a new directory to store your bot related functions
mkdir azure-changeset-bot && git initand then, open that directory in visual studio code.
4. Create a New Function
Select the Functions extension from the sidebar in VSCode, and then select the lightning bolt icon to create a new function.

It will ask you where you want to create the new function (default is the open directory in VSCode) and then what language you'd like to use. For this tutorial, we are using typescript.
Finally, it will ask what kind of trigger you want to use. Select "HTTP Trigger", since it will be triggered using a POST request after a PR is created or updated.
Then you will name, and select the authorization level of the function (I chose admin). If all goes according to plan, you should have a resulting directory that looks like this.
.
├── changeset-check
│   ├── function.json
│   ├── index.ts
│   └── sample.dat
├── host.json
├── local.settings.json
├── package-lock.json
├── package.json
└── tsconfig.json
Using Yarn instead of NPM
At my job, we use yarn instead of NPM. These next few steps are optional, but if you'd like to do the same these changes will incorporate yarn as the package manager.
First, remove the node_modules folder, and generate a yarn.lock from the package-lock.json.
rm -rf node_modules && yarn import && yarn && rm -rf package-lock.jsonThen, you will want to modify .vscode/tasks.json to remove all npm references.
{
	"version": "2.0.0",
	"tasks": [
		{
			"type": "func",
			"label": "func: host start",
			"command": "host start",
			"problemMatcher": "$func-node-watch",
			"isBackground": true,
			"dependsOn": "yarn build (functions)"
		},
		{
			"type": "shell",
			"label": "yarn build (functions)",
			"command": "yarn run build",
			"dependsOn": "yarn install (functions)",
			"problemMatcher": "$tsc"
		},
		{
			"type": "shell",
			"label": "yarn install (functions)",
			"command": "yarn install"
		},
		{
			"type": "shell",
			"label": "yarn prune (functions)",\
			"command": "yarn prune --production",
			"dependsOn": "yarn build (functions)",
			"problemMatcher": []
		}
	]
}
Then do the same in .vscode/settings.json.
{
	"azureFunctions.deploySubpath": ".",
	"azureFunctions.postDeployTask": "yarn install (functions)",
	"azureFunctions.projectLanguage": "TypeScript",
	"azureFunctions.projectRuntime": "~4",
	"debug.internalConsoleOptions": "neverOpen",
	"azureFunctions.preDeployTask": "yarn prune (functions)"
}
Developing
Before we start developing, we will want to set up our development "server" so that we can easily test what we are writing. I do this using two steps.
Open up a terminal, navigate to the directory you created, and run
yarn watchthis command will run tsc in watch mode, so it will rebuild automatically when you make changes.
Then, open the command pallete in VSCode and execute the "Tasks: Run Task" command.

It will then ask you which task to run, so select func: host start. A terminal window will open showing the output of that command. You're ready to start writing code now!
Working the Azure DevOps Node API
To begin working with azure-devops-node-api, you will first need to add it as a dependency.
yarn add azure-devops-node-api dotenvThe only thing we will need in order to grant it access to your projects is a personal access token, which you can create by following these instructions.
Once you have your token, create a .env file in the root directory of the project with the following
AZURE_PAT="<YOUR_TOKEN>"replacing <YOUR_TOKEN> with the token you generated. We will start off by making a utility file to hold some functions that make working with the API code a little bit easier.
touch utilities.tsOpen utilities.ts in VSCode.
Utility Methods
Using azure-devops-node-api isn't too complex, but does require a minor bit of set up. Namely, we need to define an authorization handler and use the token we generated.
We will start by defining a method that will get our environment variables for us.
function getEnv(name: string): string {
	const val = process.env[name];
	if (!val) {
		console.error(`${name} env var not set`);
		process.exit(1);
	}
	return val;
}
Basically, this will prevent our code from running if it can't find the environment variable with the name passed into the method.
Next, we will define a method called getApi. This will return the webApi from azure-devops-node-api.
import * as az from 'azure-devops-node-api';
import * as lc from 'azure-devops-node-api/interfaces/LocationsInterfaces';

function getEnv(name: string): string {
	const val = process.env[name];
	if (!val) {
		console.error(`${name} env var not set`);
		process.exit(1);
	}
	return val;
}

export async function getApi(baseUrl: string): Promise<az.WebApi> {
	return new Promise<az.WebApi>(async (resolve, reject) => {
		try {
			const token = getEnv("AZURE_PAT");
			const authHandler = az.getPersonalAccessTokenHandler(token);
			const api: az.WebApi = new az.WebApi(baseUrl, authHandler);
			const connectionData: lc.ConnectionData = await vsts.connect();

			resolve(api);
		} catch (e) {
			reject(e);
		}
	})
}
This code does a few things.
- Gets the personal access token from the environment
- Defines the auth handler using the personal access token
- Creates a new WebApi instance
- Connects the new WebApi instance
Finally, we will just wrap a handler around this method so that we can either pass in a baseUrl or use one from the environment.
import * as az from 'azure-devops-node-api';
import * as lc from 'azure-devops-node-api/interfaces/LocationsInterfaces';

function getEnv(name: string): string {
	const val = process.env[name];
	if (!val) {
		console.error(`${name} env var not set`);
		process.exit(1);
	}
	return val;
}

export async function getApi(baseUrl: string): Promise<az.WebApi> {
	return new Promise<az.WebApi>(async (resolve, reject) => {
		try {
			const token = getEnv("AZURE_PAT");
			const authHandler = az.getPersonalAccessTokenHandler(token);
			const api: az.WebApi = new az.WebApi(baseUrl, authHandler);
			const connectionData: lc.ConnectionData = await vsts.connect();

			resolve(api);
		} catch (e) {
			reject(e);
		}
	})
}

export async function getWebApi(baseUrl?: string): Promise<az.WebApi> {
	baseUrl = baseUrl || getEnv("API_URL");
	return await getApi(baseUrl);
}
Setting up the Trigger
The next part of this tasks is to setup the trigger for the function. If you open up index.ts in the function folder, you will see the following
import { AzureFunction, Context, HttpRequest } from "@azure/functions"

const httpTrigger: AzureFunction = async function (context: Context, req: HttpRequest): Promise<void> {
	context.log('HTTP trigger function processed a request.');

	const name = (req.query.name || (req.body && req.body.name));
	const responseMessage = name
		? "Hello, " + name + ". This HTTP triggered function executed successfully."
		: "This HTTP triggered function executed successfully. Pass a name in the query string or in the request body for a personalized response.";

	context.res = {
		// status: 200, /* Defaults to 200 */
		body: responseMessage
	};
};

export default httpTrigger;
This method defines the trigger that will be hit once a PR is created or modified. Azure will POST to the URL of this function, with the following information.
{
	"resource": {
		"pullRequestId": "<ID>",
		"repository": {
			"id": "<REPO_ID>",
			"project": {
				"id": "<PROJECT_ID>",
			}
		},
		"organization": {
			"id": "<ORG_ID>"
		}
	}
}
This information gives us everything we need to know in order to modify the PR and check for changesets. We will start out with parsing the relevant information from the request body and initializing the connection to Azure's WebApi.
import { AzureFunction, Context, HttpRequest } from "@azure/functions"
import { WebApi } from "azure-devops-node-api";

import * as dotenv from "dotenv";
import * as utils from "../utils"; // or wherever you put your utility functions

// read in our environment variables
dotenv.config();

const httpTrigger: AzureFunction = async function (context: Context, req: HttpRequest): Promise<void> {
	const organization = req.body.resource.organization.id;
	const repository = req.body.resource.repository.id;
	const project = req.body.resource.repository.project.id;
	const pullRequestId = req.body.resource.pullRequestId;

	const webApi: WebApi = await utils.getWebApi(
		`https://dev.azure.com/${organization}`
	);
};

export default httpTrigger;
Then, get the GitApi and all of the relevant PR information.
import { AzureFunction, Context, HttpRequest } from "@azure/functions"
import { WebApi } from "azure-devops-node-api";
import { IGitApi, GitPullRequest } from "azure-devops-node-api/interfaces/GitInterfaces";

import * as dotenv from "dotenv";
import * as utils from "../utils"; // or wherever you put your utility functions

// read in our environment variables
dotenv.config();

const httpTrigger: AzureFunction = async function (context: Context, req: HttpRequest): Promise<void> {
	const organization = req.body.resource.organization.id;
	const repository = req.body.resource.repository.id;
	const project = req.body.resource.repository.project.id;
	const pullRequestId = req.body.resource.pullRequestId;

	const webApi: WebApi = await utils.getWebApi(
		`https://dev.azure.com/${organization}`
	);

	const gitApi: IGitApi = await webApi.getGitApi();

	const pullRequest: GitPullRequest = await gitApi.getPullRequest(
		repository,
		pullRequestId,
		project,
		undefined,
		undefined,
		undefined,
		true
	);

	// TODO: Use the Bot to Perform the Checks
};

export default httpTrigger;
Writing the Bot
Let's use a class to represent all the bot operations we wish to perform. Create a new file in the function directory, called changebot.ts and create a new class. Our constructor for this class will take the parameters api to interact with Azure's GitApi and pr to have the relevant pull request information.
import { IGitApi } from "azure-devops-node-api/GitApi";
import { GitPullRequest } from "azure-devops-node-api/interfaces/GitInterfaces";

export default class ChangeBot {
	private api: IGitApi;
	private pr: GitPullRequest;

	constructor(api: IGitApi, pr: GitPullRequest) {
		this.api = api;
		this.pr = pr;
	}
}
We will then define a public method, called check which will check for the changeset files, and push any CHANGELOG.md and package.json changes.
import { IGitApi } from "azure-devops-node-api/GitApi";
import { GitPullRequest } from "azure-devops-node-api/interfaces/GitInterfaces";

export type ChangebotResult = {
	passed: boolean;
	threads: number[];
}

export default class ChangeBot {
	private api: IGitApi;
	private pr: GitPullRequest;

	constructor(api: IGitApi, pr: GitPullRequest) {
		this.api = api;
		this.pr = pr;
	}

	/**
	 * Performs two tasks:
	 * 1. Check that there is at least 1 changeset file
	 * 2. Generates the changelog if the changeset is not empty
	 * @returns `{ passed: true, threads: [...]}`
	 */
	public async check(): Promise<ChangebotResult> {
		// Step 1 -- Are there Changesets?
		// Step 2 -- Create a new Changelog
	}
}
The return type, ChangebotResult returns a list of threads created by the bot, and a boolean flag true if it passes, false otherwise. From here we can move on to checking for changeset files.
Checking for Changesets
Create a private method called hasChangeset. You won't need any parameters to perform this, because we already have everything we need stored as members of the class.
import { IGitApi } from "azure-devops-node-api/GitApi";
import { GitPullRequest } from "azure-devops-node-api/interfaces/GitInterfaces";

type Result = {
	passed: boolean;
	threadId?: number;
}

export type ChangebotResult = {
	passed: boolean;
	threads: number[];
}

export default class ChangeBot {
	private api: IGitApi;
	private pr: GitPullRequest;

	constructor(api: IGitApi, pr: GitPullRequest) {
		this.api = api;
		this.pr = pr;
	}

	/**
	 * Performs two tasks:
	 * 1. Check that there is at least 1 changeset file
	 * 2. Generates the changelog if the changeset is not empty
	 * @returns `{ passed: true, threads: [...]}`
	 */
	public async check(): Promise<ChangebotResult> {
		// Step 1 -- Are there Changesets?
		const hasChangeset = await this.hasChangeset();
		// Step 2 -- Create a new Changelog
	}

	/**
	 * Checks the repository associated with the Pull Request
	 * for changesets.
	 *
	 * @returns `{ passed: true, threadId: <id>}` if passed, passed: false otherwise.
	 */
	private async hasChangeset(): Promise<Result> {
	}
}
Generally, we will want to do the following within this method.
- Retrieve an updated list of changed files from the PR.
- Filter those files for unique changeset files
- Create the comment on the PR that displays the check status.
We can update the list of changed files using the GitApi by doing the following
/**
 * Create a list of all changed files
 */
private async updateFiles(): Promise<Result> {
	for (const c of this.pr.commits) {
		const changes: GitChange[] = (
			await this.api.getChanges(c.commitId, this.pr.repository.id)
		).changes;
		this.files.push(...changes.map((f) => f.item?.path));
	}
}
and updating the git interface imports to
import { IGitApi } from "azure-devops-node-api/GitApi";
import {
	GitChange,
	GitPullRequest
} from "azure-devops-node-api/interfaces/GitInterfaces";
We can then use this to get a list of all changed files and search it for changesets.
export default class Changebot {
	// ...
	// .
	// .

	/**
	 * Checks the repository associated with the Pull Request
	 * for changesets.
	 *
	 * @returns `{ passed: true, threadId: <id>}` if passed, passed: false otherwise.
	 */
	private async hasChangeset(): Promise<Result> {
		await this.updateFiles();

		const changesetFiles = this.files
			.filter((f) => f.includes("/.changeset"))
			.map((f) => f.replace("/.changeset/", ""));

		// find the unique files
		const changesets = Array.from(
			new Set(
				changesetFiles
					.filter((f) => f.split("-").length == 3 ))
					.values()
			)
		);

		const passed = changesets.length > 0;
	}
}
Now that we've determined if the PR has at least one changeset file, we will create a comment thread detailing its status.
export default class Changebot {
	// ...
	// .
	// .

	/**
	 * Checks the repository associated with the Pull Request
	 * for changesets.
	 *
	 * @returns `{ passed: true, threadId: <id>}` if passed, passed: false otherwise.
	 */
	private async hasChangeset(): Promise<Result> {
		await this.updateFiles();

		const changesetFiles = this.files
			.filter((f) => f.includes("/.changeset"))
			.map((f) => f.replace("/.changeset/", ""));

		// find the unique files
		const changesets = Array.from(
			new Set(
				changesetFiles
					.filter((f) => f.split("-").length == 3 ))
					.values()
			)
		);

		const passed = changesets.length > 0;

		let title = "";
		let description = "";
		const footer =
			"> ChangeBot looks at Pull Requests to find files generated by [@changesets/cli](https://github.com/changesets/changesets). If you feel like there is an issue, you can override the branch policy requirements, but proceed with caution.";

		if (passed) {
			title = "# Changeset Check Passed ✅\n";
			description = "Changebot was able to find the following changeset(s):\n";
			description += changesets.map((r) => `- \`${r}\`\n`).join("");
		} else {
			title = "# Changeset Check Failed ❌\n";
			description = "Changeset Bot was unable to find changeset files, and detected changes to source code in the PR.\nPlease commit your changeset to the PR to pass this check.\n";
		}

		const content = [title, description, footer].join("");

		const thread = await this.threads.upsertThread(
			content,
			(t) =>
				t?.comments?.find((c) => c?.content?.includes('# Changeset Check')) != null
		);

		passed
			? this.threads.setThreadStatus(thread, CommentThreadStatus.Closed)
			: this.threads.setThreadStatus(thread, CommentThreadStatus.Active);

		return {
			passed: passed,
			threadId: thread.id
		}
	}
}
You will also need to update the imports in changebot.ts to the following:
import { IGitApi } from "azure-devops-node-api/GitApi";
import {
	CommentThreadStatus,
	GitChange,
	GitPullRequest
} from "azure-devops-node-api/interfaces/GitInterfaces";
Creating Comments and Threads
You may have noticed in the above snippet that I called this.threads.setThreadStatus and this.threads.upsertThread. To manage threads, I created a new file called thread-manager.ts with a class called ThreadManager. This class will also use Azure's GitApi to manage different threads on the PR.
import { IGitApi } from "azure-devops-node-api/GitApi";
import { GitPullRequest } from "azure-devops-node-api/interfaces/GitInterfaces";

export default class ThreadManager {
	private api: IGitApi;
	private pr: GitPullRequest;

	constructor(api: IGitApi, pr: GitPullRequest) {
		this.api = api;
		this.pr = pr;
	}
}
ThreadManager will be responsible for:
- Upserting threads (updating threads if they exist and creating new ones if they don't)
- Retrieving threads matching certain predicates
- Finding previous comments
- Posting comments
Because this article is already lengthy and interacting with threads in Azure is well documented, I won't delve into details, but you can view the source code here.
Generating The Changelog
Create a new method in ChangeBot called generateChangelog.
export default class Changebot {
	// ...
	// .
	// .

	/**
	 * Generate a changelog entry for the given changes.
	 */
	private async generateChangelog(): Promise<Result> {
	}
}
This code gets mildly complex because we need to interface with git. To accomplish this, I wrote another manager class called GitManager. Again, for sake of time (and because we care more about programmatically generating changelogs/checking for changesets) you can check that file out in the repo.
First, start out by adding the dependencies for interfacing with changesets.
yarn add \
	@changesets/apply-release-plan \
	@changesets/config \
	@changesets/get-release-plan \
	@changesets/pre \
	@changesets/read \
	@changesets/types \
	@manypkg/get-packages \
	fs-extra \
	mdast-util-to-string@^1.0.6 \
	remark-parse@^7.0.1 \
	remark-stringify@^7.0.3 \
	unified@^8.3.2
You'll want to create a new utility method that gets an entry from the Changelog. This code is lifted directly from the Changeset Github Action.
/**
 * Semantic "Bump" Versions
 */
export const ChangesetBumpLevels = {
	dep: 0,
	patch: 1,
	minor: 2,
	major: 3,
} as const;

/**
 * Get the changelog entry for the given verison of the package.
 *
 * @param changelog changelog content to parse through
 * @param version version to get entry for
 * @returns changelog entry for the given version
 */
export async function getChangelogEntry(changelog: string, version: string) {
	let ast = unified().use(remarkParse).parse(changelog);
	let highestLevel: number = ChangesetBumpLevels.dep;
	// @ts-ignore
	let nodes = ast.children as Array<any>;
	let headingStartInfo:
		| {
			index: number;
			depth: number;
		   }
		| undefined;
	let endIndex: number | undefined;
	for (let i = 0; i < nodes.length; i++) {
		let node = nodes[i];
		if (node.type === "heading") {
			let stringified: string = mdastToString(node);
			let match = stringified.toLowerCase().match(/(major|minor|patch)/);
			if (match !== null) {
				let level =
					ChangesetBumpLevels[match[0] as "major" | "minor" | "patch"];
				highestLevel = Math.max(level, highestLevel);
			}
			if (headingStartInfo === undefined && stringified === version) {
				headingStartInfo = {
					index: i,
					depth: node.depth,
				};
				continue;
			}
			if (
				endIndex === undefined &&
				headingStartInfo !== undefined &&
				headingStartInfo.depth === node.depth
			) {
				endIndex = i;
				break;
			}
		}
	}
	if (headingStartInfo) {
		// @ts-ignore
		ast.children = (ast.children as any).slice(
			headingStartInfo.index + 1,
			endIndex
		);
	}
	return {
		content: unified().use(remarkStringify).stringify(ast),
		highestLevel: highestLevel,
	};
}
Using this code, we can do the following in our changelog generation method:
import { CommitResult, PushResult } from 'simple-git';
import getChangesets from "@changesets/read";
import getReleasePlan from "@changesets/get-release-plan";
import { getPackages } from "@manypkg/get-packages";
import { getChangelogEntry } from "../utils";
import { join } from "path";
import fs from "fs-extra";
import * as child_process from "child_process";
import { promisify } from "util";

const exec = promisify(child_process.exec);

export default class Changebot {
	// ...
	// .
	// .

	/**
	 * Generate a changelog entry for the given changes.
	 */
	private async generateChangelog(): Promise<Result> {
		const files = ["CHANGELOG.md", "package.json"];

		await this.git.checkout();
		const changesets = await getChangesets(this.git.dir);
		const releasePlan = await getReleasePlan(this.git.dir, "main");
		const packages = await getPackages(this.get.dir);
		const config = await read(this.git.dir, packages);

		await applyReleasePlan(releasePlan, packages, config);

		files.push(...changesets.map((c) => `.changeset/${c.id}.md`));
		await this.git.add(files);

		const commit: CommitResult = await this.git.commit(
			"chore(changelog): generate changelog"
		);
		const push: PushResult = await this.git.push();

		const pkg = require(join(this.git.dir, "package.json"));
		const changelog = await fs.readFile(
			join(this.git.dir, "CHANGELOG.md"),
			"utf-8"
		);
		const contents = await getChangelogEntry(changelog, pkg.version);
	}
}
From there, you can create a new thread in the same way that we did for the changeset check, and return the result of the function.
Wrapping Up
Go back the the changebot.ts file,
export default class Changebot {
	// ...
	// .
	// .

	/**
	 * Performs two tasks:
	 * 1. Check that there is at least 1 changeset file
	 * 2. Generates the changelog if the changeset is not empty
	 * @returns `{ passed: true, threads: [...]}`
	 */
	public async check(): Promise<ChangebotResult> {
		// Step 1 -- Are there Changesets?
		const hasChangeset = await this.hasChangeset();
		// Step 2 -- Create a new Changelog (if Step 1 passes)
		if (hasChangeset.passed) {
			await this.git.initialize(this.pr);
			const createdChangelog = await this.generateChangelog();
			return {
				passed: hasChangeset.passed && createdChangelog.passed,
				threads: [hasChangeset.threadId, createdChangelog.threadId]
			}
		}
		return {
			passed: hasChangeset.passed,
			threads: [hasChangeset.threadId]
		}
	}
}
Head back to the index file, and create a new ChangeBot instance to be able to run the check.
import { AzureFunction, Context, HttpRequest } from "@azure/functions"
import { WebApi } from "azure-devops-node-api";
import { IGitApi, GitPullRequest } from "azure-devops-node-api/interfaces/GitInterfaces";

import * as dotenv from "dotenv";
import * as utils from "../utils"; // or wherever you put your utility functions

// read in our environment variables
dotenv.config();

const httpTrigger: AzureFunction = async function (context: Context, req: HttpRequest): Promise<void> {
	const organization = req.body.resource.organization.id;
	const repository = req.body.resource.repository.id;
	const project = req.body.resource.repository.project.id;
	const pullRequestId = req.body.resource.pullRequestId;

	const webApi: WebApi = await utils.getWebApi(
		`https://dev.azure.com/${organization}`
	);

	const gitApi: IGitApi = await webApi.getGitApi();

	const pullRequest: GitPullRequest = await gitApi.getPullRequest(
		repository,
		pullRequestId,
		project,
		undefined,
		undefined,
		undefined,
		true
	);

	const bot = new ChangeBot(gitApi, pullRequest, utils.getEnv('AZURE_PAT'));;
	const res = await bot.check();

	context.res = {
		status: res.passed,
		body: res.threads
	}
};

export default httpTrigger;
You can then deploy this to Azure Functions, and set it up as a custom branch policy.